I found this recipe for No Bake Energy Bites and adapted it. These are great for breakfast and a quick snack. They are rich and strong flavored. I listed what I used in red.
* 1/2 c Nut butter (almond butter, peanut butter, sunflower seed butter or any other nut or seed butter)
* 1/3 c honey
* 1 c old fashioned rolled oats
* 1 c shredded unsweetened coconut (or wheat bran/germ, oat bran, some ground flax seed, ground nuts or sesame seeds.)
* 2 t vanilla
* pinch of sea salt
* 1-2 t your favorite spices or spice combination (optional - I used 1/2 t cinnamon)
* 1/2 c other add-ins (roughly chopped nuts or seeds, dried fruit, mini chocolate chips, etc)
Mix together the nut butter, honey, vanilla and salt if needed. Then mix in the remaining ingredients. I used
equal parts sesame seeds, coconut and mini chocolate chips. Mix well. Allow to chill slightly and then roll dough into 1-2" balls.
Keep refrigerated or frozen until you are ready to use. Makes approximately 18-24 depending on size.

Showing posts with label freezer. Show all posts
Showing posts with label freezer. Show all posts
Tuesday, November 8, 2011
Monday, October 10, 2011
Cinnamon French Toast
If I could keep cinnamon bread around the house, I could easily make cinnamon french toast. But cinnamon bread is a luxury that rarely finds its way into my pantry. Since that's the case, I make due with my own concoction.
 4 eggs
1/4 c milk (cow, rice, nut)
1 t vanilla
1/2 - 1 t cinnamon (to your taste)
8 pieces of bread (regular, french bread, gluten-free, etc)
Whisk all ingredients together in a shallow dish. Dip bread in egg mixture to coat and place on a hot, well greased griddle. When the first side moves easily it is lightly golden, flip and fry until golden on the second side. Top with maple syrup, fruit, whipping cream, or your favorite toppings.
These freeze well. Simply pop into the toaster to re-crisp the toast. My kids like them cut into strips so they can dip them into the syrup.
Tuesday, October 4, 2011
Applesauce Time
One thing I love about North Dakota, lots of people have their own apple trees and are more than willing to share them. Unfortunately most of my favorite varieties of apples do not tolerant the winter temps this far north. So I'm left with a tart apple called a Haralson (or varieties there of). I've processed probably about 2 bushels so far.
So a new apple variety has made my saucing a bit different this year. I haven't added sugar to my applesauce in years. I typically use a combination of gala, golden delicious, jonagolds, or other sweeter apples. Using those, I've had a sweet sauce requiring nothing but a touch of cinnamon, but that's just my taste. My boys and I aren't a fan of tart, so in goes the sugar. A trade off for free apples I guess.
While in Michigan I had the luxury of a wonderful friend Martha who taught me how to make and can applesauce. We always did it together and I used her equipment. Boy did I miss that when I moved to the northern plains. I've been using my apple-peeler-corer-slicer to prep my apples, then cook them down and mash them with a potato masher. It has worked effectively, but it's quite a bit of work. I do however love the chunkier texture of the applesauce.
So I gave in and got one of these beauties part way through this canning season.
My Norpro Sauce Master a new friend. I'm inspired to try all sorts of new things with it... Tomato sauce is coming next, followed by mashed potatoes, pureed pumpkin, and all sort of veggie purees for enhancing recipes (like my loaded tomato sauce). The only issue is running out of freezer space and canning jars. It's a great problem to have.
I've gotten quite a few questions about canning lately. I wish I was an expert on this. What I know is hot food, hot jars, hot lids, and a hot water bath. Keep everything hot to avoid bacteria. I use this website for most of my canning questions. I'm hoping to learn more about using a pressure cooker for canning so that I can put up my own meat sauces (marinara, alfredo, etc) and soups. Most of that is going to have to wait for winter for time to experiment.
For now I have all the goods from our CSA share to enjoy. The corn was amazing. I have 120+ ear of corn cooked and cut off the cob, 10 gallons of green beans, and 5 gallons of broccoli waiting in the freezer. The apples are sauced. Now to get a few more to make apple pie filling to can and some great desserts just to enjoy. Then bring on tomatoes, potatoes, and pumpkin.
We are going to eat well and healthy this winter!
So a new apple variety has made my saucing a bit different this year. I haven't added sugar to my applesauce in years. I typically use a combination of gala, golden delicious, jonagolds, or other sweeter apples. Using those, I've had a sweet sauce requiring nothing but a touch of cinnamon, but that's just my taste. My boys and I aren't a fan of tart, so in goes the sugar. A trade off for free apples I guess.
While in Michigan I had the luxury of a wonderful friend Martha who taught me how to make and can applesauce. We always did it together and I used her equipment. Boy did I miss that when I moved to the northern plains. I've been using my apple-peeler-corer-slicer to prep my apples, then cook them down and mash them with a potato masher. It has worked effectively, but it's quite a bit of work. I do however love the chunkier texture of the applesauce.
So I gave in and got one of these beauties part way through this canning season.
 |
| Photo Credit |
I've gotten quite a few questions about canning lately. I wish I was an expert on this. What I know is hot food, hot jars, hot lids, and a hot water bath. Keep everything hot to avoid bacteria. I use this website for most of my canning questions. I'm hoping to learn more about using a pressure cooker for canning so that I can put up my own meat sauces (marinara, alfredo, etc) and soups. Most of that is going to have to wait for winter for time to experiment.
For now I have all the goods from our CSA share to enjoy. The corn was amazing. I have 120+ ear of corn cooked and cut off the cob, 10 gallons of green beans, and 5 gallons of broccoli waiting in the freezer. The apples are sauced. Now to get a few more to make apple pie filling to can and some great desserts just to enjoy. Then bring on tomatoes, potatoes, and pumpkin.
We are going to eat well and healthy this winter!
Tuesday, July 26, 2011
Carne Asada Marinade
On our last freezer cooking adventure, we made a carne asada marinade. We put the steak in a gallon freezer bag, put all the ingredients in a blender to mix it up, and poured the marinade over the steak. Grill the meat to medium and allow the meat to rest/cool a bit before slicing. Be sure to cut the steak thinly, cross-grain to keep it as tender as possible.
When I pulled the steak out to make the tacos this week, it turned out tender and flavorful. My son couldn't get enough of it. This is a great way to use a less expensive cut of meat, and not a lot of it to feed the whole family. Serve with lots of veggies (peppers, onions, lettuce, tomatoes/salsa, etc) and a bit of sour cream.
3/4 c Oil (I used olive oil) - I'd use 1/2 c next time
1/4 c Lime Juice
2 cloves Garlic
1/2 t Cumin
1 t Salt
1/4 t Pepper
1/4 t Chili powder (optional)
Thursday, July 21, 2011
Freezer Meal Ordeal - Summer
It was another round of freezer cooking with my girlfriends from our small group last weekend. It was a lot of fun and laughs (as usual), but a great time to really talk in depth about life and our experiences.
I love that cooking together allows us that uninterrupted time (thanks guys for handling the kids) to share life and our hearts. Working side-by-side with other generates a great environment for deepening relationships. Not only do we come out with lots of great food to save us cooking later, but a bit refreshed personally as well.
What was the menu?
Mini Ice Cream Pies (we did vanilla this time)
Belgian Waffles
Oatmeal pancakes
Sesame Garlic Chicken
Turkey Taco Meat (with pureed peppers) - recipe coming
Marinaded Meat - raw with marinade ready to grill
- Carne Asada
- Garlic Herb Chicken - recipe coming
I admit, we've already eaten several of the items. Need to pace myself to make these last.
Tuesday, April 12, 2011
Freezer Meal Ordeal
I am prepping for a major freezer-meal cooking marathon this weekend. Hoping that having a stash of go-to meals in the freezer will make mealtime so much more convenient and faster.
What's on the menu?
Lasagna Rolls (still looking for gluten-free lasagna noodles)
Dairy-Free Beef Stroganoff
Loaded Tomato Sauce
Polynesian Pork
Fiesta Chicken Enchiladas
Breakfast Burritos
Make two meals of each and I've got a large portion of our meals made for the month. I can handle that. I'm hoping to get some breakfast foods made this weekend to freeze ahead too.
Sunday, April 10, 2011
Dairy-free Beef Stroganoff
I've posted a recipe before for Beef Stroganoff before. I still really like it, but I can't feed it to my son with a dairy allergy. It was a favorite, so I needed to find a way to make it safe. What we came up with was really good.
In a crockpot add:
2-3 lbs of Steak, cubed (any inexpensive cut will work)
1 pkg Beef Stock concentrate + 2 c water or 1 can beef broth
2 t Onion Powder
1/2 t Celery Salt or powder
1 T Minced Onion
1/4 - 1/2 t Salt
Cook on high 3-4 hrs or low for 7-8 hrs. When meat is fork tender, drain off liquids into a sauce pan. Bring to a boil. Add 1/4 t pepper and wisk (if soy isn't an issue, add 1 T of Worcestershire). Make a slurry by mixing 1 T or cornstarch to 2 T of water. Slowly wisk into liquid until desired consistency is reached. Return sauce to meat.
Serve over rice or egg noodles. If you miss it, mix in 1 t of sour cream to non-allergen eaters portion. I really didn't miss it at all.
Tuesday, November 23, 2010
Slow Cooker Apple Butter
Apple butter is one of those great fall flavors. I've also found it INCREDIBLY easy and inexpensive to make. Break out the slow cooker and it pretty much makes itself. If you teach my kids, act surprised when you get this for Christmas...
Apple butter is a great topping for bread/toast and all those traditional uses, but I've also started using it in baked goods like the Apple Cinnamon Frosting and in pancakes. If I can use pumpkin in it, I'm trying using the apple butter in it's place for a different flavor. It cooks very much the same.

5-7 pounds apples - peeled, cored and finely chopped
3/4 c brown sugar**
3 t cinnamon
1/4 t ground cloves
1/4 t nutmeg
1/2 teaspoon salt
1. Place the apples in a slow cooker and toss with sugar, cinnamon, nutmeg, cloves and salt.
2. Cover and cook on high 1 hour.
3. Reduce heat to low and cook 9 to 11 hours, stirring occasionally, until the mixture is thickened and dark brown. (I let it go overnight)
4. Blend in either food processor or blender for a smooth consistency (or leave it lumpy if you'd like). Return to slow cooker and continue cooking on low 1 hour uncovered.
5. Spoon the mixture into sterile containers, cover and refrigerate or freeze. To can, pour hot apple butter into hot jars and process in a hot water bath for 10-12 minutes.
** I use sweet apples (Jonagold, Golden Delicious, Gala, etc.) that don't require much added sugar. Sweeten to you own liking.
Apple butter is a great topping for bread/toast and all those traditional uses, but I've also started using it in baked goods like the Apple Cinnamon Frosting and in pancakes. If I can use pumpkin in it, I'm trying using the apple butter in it's place for a different flavor. It cooks very much the same.

This is at the early stage of the process.
5-7 pounds apples - peeled, cored and finely chopped
3/4 c brown sugar**
3 t cinnamon
1/4 t ground cloves
1/4 t nutmeg
1/2 teaspoon salt
1. Place the apples in a slow cooker and toss with sugar, cinnamon, nutmeg, cloves and salt.
2. Cover and cook on high 1 hour.
3. Reduce heat to low and cook 9 to 11 hours, stirring occasionally, until the mixture is thickened and dark brown. (I let it go overnight)
4. Blend in either food processor or blender for a smooth consistency (or leave it lumpy if you'd like). Return to slow cooker and continue cooking on low 1 hour uncovered.
5. Spoon the mixture into sterile containers, cover and refrigerate or freeze. To can, pour hot apple butter into hot jars and process in a hot water bath for 10-12 minutes.
** I use sweet apples (Jonagold, Golden Delicious, Gala, etc.) that don't require much added sugar. Sweeten to you own liking.
Sunday, October 3, 2010
Freezing Green Peppers
Here's another installment in the much delayed series on "How To" process fall produce and seasonal favorites.
I found a great deal on peppers and bought way more than I could (or should) ever use by time they would go bad. Here's a great way to use them and process them. I diced them up and spread them out over top of some plastic wrap. Then "flash freeze" (spread out to freeze them individually and then store together) them for a couple of hours.

After the fast freeze, remove the peppers from the pan/plastic wrap and store them in a freezer bag. You can pull them out and use them as needed. **
 Because when the thaw, the frozen peppers will be a little soft. Wouldn't recommend using these in a raw preparation, but works perfectly for spaghetti sauce, fajitas, stir fry, and anything else you could think of.
You can freeze the colored peppers separately if you want, but I like to mix them for color and flavor.
**I'm the only one in my family that enjoys peppers much, so this method is cost effective. I can grab a few peppers at a time for what I need.
Friday, September 24, 2010
Chicken Fiesta Enchiladas
A bunch of leftovers was combines to make these amazing enchiladas. I used the base recipe from my Creamy Chicken Enchiladas and tried to make it a bit healthier and fresher. We've also been looking at cutting back our meat consumption to help control grocery costs and focus on eating more fruits and veggies. This meal does both. My husband likes these even better than the original.
 10 - 12 Tortillas
1 c Chicken, cooked and shredded
1 c Sour cream
1 t Taco seasoning
1 sm can Green chilis, drained
8 oz Monterrey Jack cheese, shredded & divided
1 c White rice, cooked and cold
1 c Corn
1 c Bell pepper, chopped
1 can Green enchilada sauce
Mix together the soup, sour cream, taco seasoning, and green chilis. Add in the chicken, rice, corn, peppers, and 3/4 c of cheese and mix together. Spoon about 1/3 - 1/2 cup of the mixture into each tortilla and lay in a 9 X 13 baking pan*, seam side down.
Pour the enchilada sauce over the filled tortillas and top with the remaining cheese. Bake in a 350 degree oven for 30 - 40 minutes until bubbly and the cheese is lightly browned. Serve with lettuce, cilantro, chopped tomatoes, sour cream, or other garnishes of your choice.
* I usually split this into 2-3 meals for my husband and I since it isn't a favorite with my kids. It freezes well.
Thursday, September 9, 2010
Homemade Pumpkin Puree
Evidently there was a pumpkin shortage last year. I've been unable to get any canned pumpkin in quite awhile. I got tired of waiting so I made my own...
My favorite organic stand at the farmer's market had pie pumpkins for $1 each, so we snatched up three of them. From those pumpkins I now have about 16 cups of pumpkin puree. Not bad for $3 and just a little bit of work.
Start by washing off the pumpkin and cutting it in half. Scoop out the seeds (save for roasting) and strings and place cut side down on a baking dish. Pour water into the dish to about 1/4" depth. Roast in a 350 degree oven for about an hour. Test with a knife to see if the skin and flesh can be easily pierced. Note: the pumpkins may appear "caved in" but that's good. Allow to cool slightly and scoop out the flesh. Discard the exterior shell. In a food processor or blender add a small of water at a time to pumpkin to bring to a smooth consistency. You don't want lumps, but you don't want it thin and runny either.
 Place puree in a strainer lined with cheesecloth to allow the liquid to drain from the puree and give a good thick consistency. The liquid drained can be used to puree more batches of pumpkin rather than water.
 Use in your favorite pumpkin pancakes (Gluten-free version), pumpkin apple muffins, pumpkin trifle, pumpkin cheesecake or other fall delight. Can be frozen in muffin tins or in freezer bags.**
 **Tips: Pictured from left to right. When using freezer bags, roll the zipper portion over the outside of the bag when filling. This keeps from getting puree in the tracks and making a mess. When you're ready to close it up unroll the zipper part to stand upright. Seal the bag 4/5 the way and roll out any air in the package. Lay the package flat to freeze.
Tuesday, September 7, 2010
Homemade Chicken Broth
So if you are looking for exact measurements, this is not the post for you ;) but keep reading anyway. I greatly dislike paying large amounts of money for flavorless chicken stock in the store. And guaranteeing that it is gluten-free is another thing. So I've decided to make my own. I've frozen and canned it and find benefits to both methods. More on that later. Let's start at the beginning.
First I start with 1 onion, 2-3 stalks of celery, and 3 carrots (all roughly chopped) in a large stock pot with a bit of olive oil. Over medium heat, I soften the veggies and let the little bits of brown bits (caramelized goodness) collect on the bottom, stirring occasionally.
At that point I add 2 cups of water and use a wooden spoon to loosen any of those bits and color from the bottom of the pan. Then I add chicken bones (just the ones left over from dinner) and another 14-22 c of water to the pan. Season with 3 t of salt and 1 t of pepper.
 Bring the pot to a rolling boil and then reduce to medium-low heat. Stirring occasionally, allow to simmer 2-3 hours.
 When it's finished you have a beautiful broth. Strain out the veggies and bones and allow to cool completely, and refrigerate. You can freeze it in jars (be sure the lid isn't closed tightly because the jar with break - not that I learned by experience or anything), 1/4 c portions in muffin tins (pop out and store in freezer bags), or can it.
 For canning, reheat the broth and pour into a hot jar. You'll need to process it by using a pressure cooker. I learned the hard way that hot water baths don't kill the bacteria and you end up with nastiness in a jar.
This is any easy production following dinner. I through everything in the pot after dinner and let it simmer away for the evening. I stash it away in the fridge and then either can it or freeze it the next day. It costs almost nothing and is a great way to use up those wilting veggies left in your refrigerator door.
At this cost I use it to cook rice in and sometimes pasta. Bring on the soups now at half the cost.
** Note: Another great way to make broth is not only to use the bones, but a the chicken on the bone. That will give you the richest possible broth. In the winter I do this method. But while the weather allows, I would much rather eat grilled chicken.
First I start with 1 onion, 2-3 stalks of celery, and 3 carrots (all roughly chopped) in a large stock pot with a bit of olive oil. Over medium heat, I soften the veggies and let the little bits of brown bits (caramelized goodness) collect on the bottom, stirring occasionally.
At that point I add 2 cups of water and use a wooden spoon to loosen any of those bits and color from the bottom of the pan. Then I add chicken bones (just the ones left over from dinner) and another 14-22 c of water to the pan. Season with 3 t of salt and 1 t of pepper.
 Bring the pot to a rolling boil and then reduce to medium-low heat. Stirring occasionally, allow to simmer 2-3 hours.
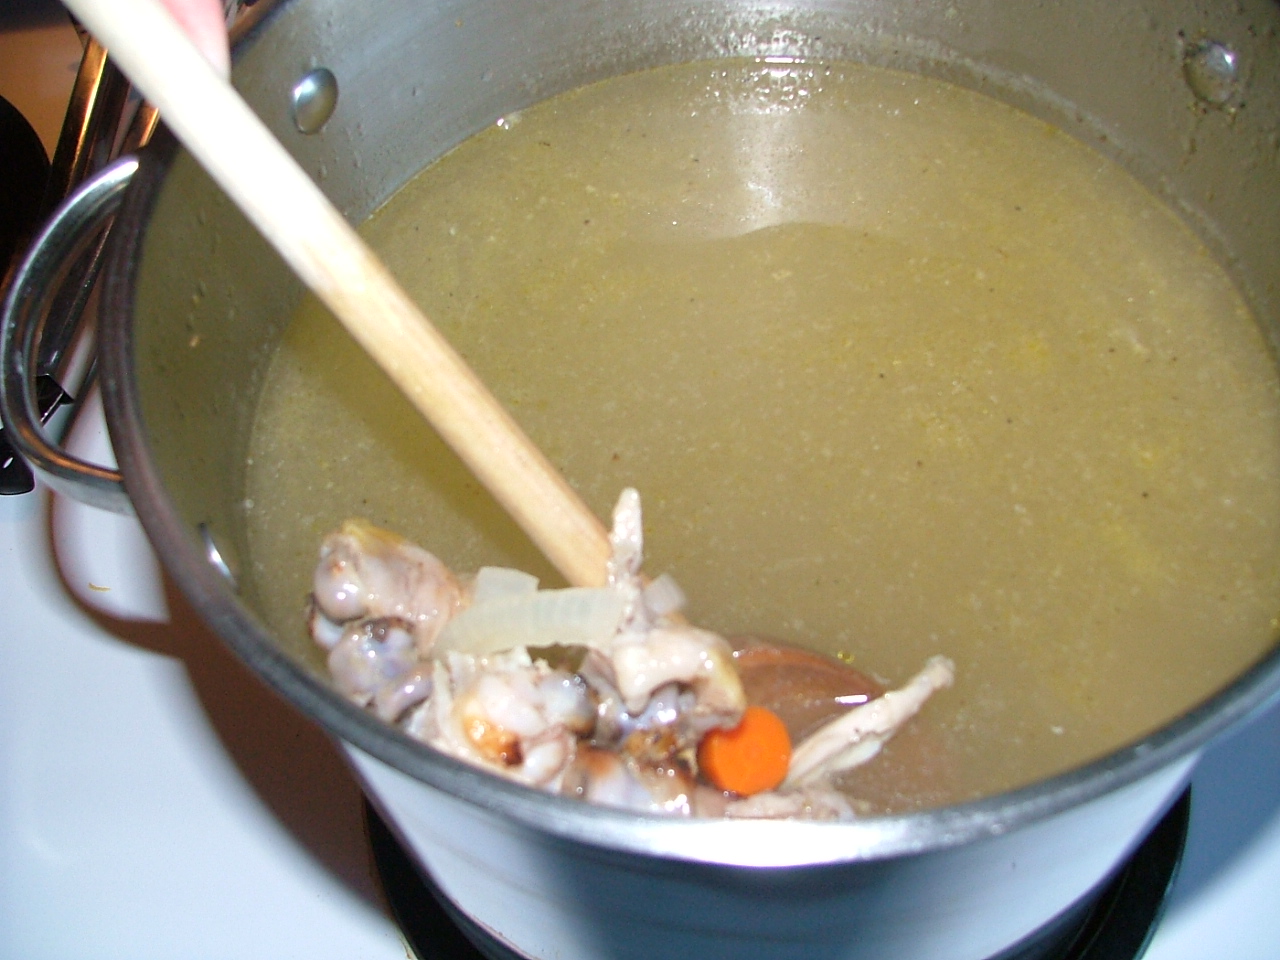 When it's finished you have a beautiful broth. Strain out the veggies and bones and allow to cool completely, and refrigerate. You can freeze it in jars (be sure the lid isn't closed tightly because the jar with break - not that I learned by experience or anything), 1/4 c portions in muffin tins (pop out and store in freezer bags), or can it.
 For canning, reheat the broth and pour into a hot jar. You'll need to process it by using a pressure cooker. I learned the hard way that hot water baths don't kill the bacteria and you end up with nastiness in a jar.
This is any easy production following dinner. I through everything in the pot after dinner and let it simmer away for the evening. I stash it away in the fridge and then either can it or freeze it the next day. It costs almost nothing and is a great way to use up those wilting veggies left in your refrigerator door.
At this cost I use it to cook rice in and sometimes pasta. Bring on the soups now at half the cost.
** Note: Another great way to make broth is not only to use the bones, but a the chicken on the bone. That will give you the richest possible broth. In the winter I do this method. But while the weather allows, I would much rather eat grilled chicken.
Monday, September 6, 2010
Freezing Sweet Corn
There is nothing like the taste of fresh summer sweet corn. Sorry Green Giant and other manufactures... it's just not the same. So I'm stock piling the summer goods to get me through the long winter.
It's SUPER simple. Put a couple of big pots of water on to boil while you husk all of your corn and get it ready. Fill a large bowl of cold water or a clean sink water plus ice. Put the corn in a boiling pot of water for 4-5 minutes to partially cook it. Then submerge it in the ice water to stop the cooking. When it is completely cooled, set it aside to dry.
Here's my tip to start with - be prepared with LOTS of ice. Get your ice maker pumping it out in advance and bag it up or head on out to the convenience store and pick up a bag. It will make your life a lot easier. The hot corn heats up the water quickly.
When the corn is cooled and dried off, Cut the corn off the cob and set it aside to bag when you are done. I package corn in serving size for our family 2-3 c in a freezer bag.
 Then seal up the bag except for a about 1 inch on the end. Roll the bag to squeeze out as much of the air as possible and finish sealing the bag.
 Finish by flattening out the bag and corn so that it lays flat. Takes some squishing and moving around to even it out.
 By freezing the corn laying flat, you can than stack them upright in a tote or box and save yourself much of the room in the freezer.
When you feel like some sweet summer corn, heat on the stove top with a bit of water or in the microwave for about 5 minutes.
Sunday, September 5, 2010
How to Series
I've been busy putting up summer produce and getting my oldest off to school. That has meant not much posting and definitely not much in the way of cooking and creating new recipes. The good news is school has started and life is SO much easier with one (who starts pre-school next week) than two who've had a very long summer together. Hopefully that gives kiddo #2 and me more time in the kitchen to play.
In the process of putting up all sorts of goodies, I've had several requests and questions about "How did you do that?" referring to canning and freezing different items. So here are a few things to look forward to attempting to answer those questions.
Freezing:
Sweet Corn
Bell Peppers
Chicken Broth
Green Beans
Pumpkin Puree
Canning:
Peaches
Applesauce
Chicken Broth
Making:
Chicken broth
Applesauce
Pumpkin puree
and more.
Tuesday, August 3, 2010
Oatmeal Breakfast Cookies
So I've been researching breakfast cookies for a while. I knew that they would be an easy sell for the kiddos. A cookie for breakfast? They thought they had died and gone to heaven. I kind of mixed up a whole lot of recipes and added a few things of my own.
These taste great. But I need someone to explain the science to me about why the batter when contacted with air the batter started to turn green. The first batch turned out with just a green tint (pictured). The second set of cookies to go in were quite green from the sitting out in the air for 20 minutes while the first set baked. They taste completely fine and no one is sick, but something about the combination is making a green color. Maybe a fit for Christmas or St. Patty's???
 1/2 c Sunbutter butter (or any nut butter)
1/2 c Applesauce
1/2 c Brown sugar, packed
1 Egg (or 3 T water/1 T flax meal mixed)
1 t Vanilla
2 ripe Bananas, mashed
1/2 t Baking soda
1/2 t Salt
2 c Flour (or Carol Fenster GF mix)
1 T Flaxseed, ground
2 c Old Fashioned oats*
1 c Dried fruit or chocolate chips
* I only have GF rolled outs so I pre-moistened them with about 1/2 c of apple juice and stirred it until the juice was absorbed.
Beat the sunbutter and applesauce until combined. Beat in the brown sugar, egg, and vanilla. Add in the bananas, baking soda, and salt. Add the flour and ground flaxseed, mixing until combined. Stir in the oatmeal and raisins/chips.
Drop 1/4 cup dollops of batter four inches apart onto parchment paper. Bake for 15-18 minutes at 350. Let stand 1 minute on the tray, then remove to a wire rack.
Monday, July 19, 2010
Buckwheat Waffles
Another success in gluten-free, egg free, dairy free cooking for me!! I made waffles that everyone liked. These came out really crisp and pretty lightweight. Make them g-free or with standard ingredients. Either way they are going to be good and really filling.
 1/2 c oat flour flour*
1/2 c buckwheat flour**
1 c Flour (GF mix)
2 t baking powder
3/4 t salt
1/2 t baking soda
1/4 t xanthan gum (only for GF mix)
1/4 c raw or brown sugar
2 eggs (EF, use use replacer)
2 c milk (cow, rice, nut, hemp)
1/4 c Oil (I used sunflower)
Combine all dry ingredients together with a whisk. In a separate bowl, slightly warm milk (not hot) and whisk together with oil & egg yolks (skip for egg free), then add to dry mix. Separately, whisk egg whites (or replacer) unto fluffy. Fold egg (replacer) into other ingredients. Heat and oil your waffle maker and cook until crisp
* Don't bother buying oat flour, it's expensive and easy to make. Stick a bunch of oats into the blender, food processor, or coffee grinder (cleaned) and powderize it. For GF, grind up Bob's Red Mill gluten-free oats.
** Don't let the name fool you, Buckwheat contains no wheat and is actually gluten-free. Thanks to the pediatric nutritionist for filling me in on that.
TOP THEM: with maple syrup, jam, fresh berries, pie filling, compote, whipped cream, or whatever you like.
Feel free to freeze the leftovers. Pop them into the toaster for a quick breakfast.
Tuesday, July 13, 2010
Gluten-Free Pumpkin Pancakes
1 1/4 c GF Flour Mix (I used 1/2 c millet, 1/2 c potato starch, and 1/4 c oat flour)
2 t baking powder
1/2 t baking soda
1/4 t Xanthan gum
1 t cinnamon
1/2 t salt
2 T raw or brown sugar
7 T pumpkin puree (about 1/2 can of pumpkin)
2 T oil
1 c milk (cow, rice, nut)
1 egg (or replacer)
Stir dry ingredients together. In a separate bowl, wisk the wet ingredients. Mix wet ingredients into dry ingredients. Heat your a griddle and oil it with coconut or canola oil. Pour about 1/3 c of batter and cook until bubbles start to burst and the better stiffens. Flip and cook the other side for another minute or two.
These will have a slightly moist consistency to them but the flavor is great. My allergy son, who hasn't seemed to like much of anything I've made gluten free, loved these. Yeah for one small success. Oh, my husband and non-allergy son liked them too.
** Sorry no picture, they were eaten too fast and I was just overjoyed they were being eaten. I'll get a picture next time.
Thursday, May 6, 2010
Best Banana Bread
This recipe came from my friend Andrea, and yes, this is the best banana bread I've had.
1/2 cup butter or margarine
1 cup sugar
2 eggs
3 bananas, mashed
1/4 cup milk
2 cups flour
1 tsp baking soda
1 tsp vanilla
Mix all ingredients. Pour into 2 loaf pans. Bake at 350 degrees for 45 minutes. Can be made into muffins. Bake 30-35 minutes.
Total Costs: $1.95
Butter $.45 (Sunmart)
Sugar $.25 (Cashwise)
Bananas $.60 (Cashwise)
Milk $.20 (Sunmart)
Flour $.45 (Tochi's)
Tuesday, April 6, 2010
Mini Grasshopper Ice Cream Pie with Hot Fudge
Portion control and desserts - that's a hard one. If there is a pie, cake, or large dessert to be eaten, than it's easy to overeat. Put them into a personal size serving makes things easier. The muffin tin is again my friend. This little mint treat is easy to make and then keep frozen until the mood strikes you. Great for parties because they are pre-made and ready to serve.
 25 Chocolate wafer cookies, filling removed
1/3 c Butter, melted
1 qt Mint chocolate chip ice cream, softened
Hot fudge (recipe following)
HOT FUDGE (or store bought)
1 cup Butter
1/2 cup Unsweetened cocoa powder
3 cups White sugar
1 (12 fluid ounce) Can evaporated milk
1 tsp Vanilla extract
Combine butter, cocoa, sugar and evaporated milk in a saucepan over medium heat. Bring to a boil and boil for 8 minutes. Remove from heat; stir in vanilla. Carefully pour hot mixture into a blender and blend for 2 to 4 minutes. Serve immediately. Store in refrigerator.
Crush chocolate cookie wafers until crumbs, add melted butter and stir until incorporated.
Gently press 1 tsp of cookie mixture into a cupcake liner in a muffin pan. Place a scoop of ice cream in each cup and press in until cup is full.
Place ice cream cakes (still in muffin pan) in freezer until firm. Allow ice cream cakes to thaw for a few minutes before serving. Top with hot fudge. The recipe makes tons more fudge than you'll need. Store in a airtight container and refrigerate.
Makes 18-24 Servings
Total Costs: $6.40**
Ice Cream:$2.50 (Cashwise)
Cookies: $.50 (Dollar Tree)
Butter:$.40 (Sunmart)
Fudge: $3.00 (Various or store bought)
** That may not sound frugal, but that's 18-24 servings depending on how big you make them. That's a lot of dessert. A family of 4 can eat one a day for 5-6 days or serve a big crowd.
Monday, April 5, 2010
Grilled Pork Chops
Spring weather just drives me to the grill. In fact we grill year round because we love the flavor so much. In our recent move, our 10-year-old gas grill did not make it. But that's okay because it was a pain to have to use pliers to turn the gas knobs (broken) and tongs or pliers to open the top (the handle broke off). It has done a serious tour of duty in harsh MI conditions.
So we are on the hunt to buy a grill now that the 3-4' drifts have melted away. Cannot wait to get one set up because I can just taste these beauties.
 Simple marinades for pork that make the grill flavor even better. These proportions are for about 4-5 large chops. I rarely measure marinades, so these are more estimates These marinades are nice for a "fresh" taste. Can use them for chicken and some for steak as well.
Pork: $4.00 (Sunmart or less on full loin chopped up)
Most of these are items you already have on hand in your cupboards. So in my book, I count the marinades as free.
Couple of grilling tips: Make sure that your grill is good and hot before putting the meat on. Rub a bit of oil on the grates (use a basting brush or a coated paper towel) to keep it from sticking if there isn't any in the marinade. Use the reserve marinade to baste while cooking. When done cooking, allow to sit for 5-10 minutes to keep juices locked in.
Bring on Spring.
So we are on the hunt to buy a grill now that the 3-4' drifts have melted away. Cannot wait to get one set up because I can just taste these beauties.
 Simple marinades for pork that make the grill flavor even better. These proportions are for about 4-5 large chops. I rarely measure marinades, so these are more estimates These marinades are nice for a "fresh" taste. Can use them for chicken and some for steak as well.
- Lightly coat with Soy Sauce & Lawry's Season Salt (can just do on grill do not have to marinade ahead of time
- 1/2 c Soy Sauce, 1 T brown Sugar, 1/4 t Cumin, 1/8 t Paprika
- 1/2 c Soy Sauce, juice of 1/2 lime, 1 T Olive Oil, 1 t Sugar, 1/8 t Pepper
- 1/2 c Soy Sauce, 1/8 t Chili Powder, 1/8 t Cumin, 1/4 t Garlic Powder, 1 t Honey
- 2 T Olive Oil, 1/2 t dried Thyme, 1/4 t Garlic Powder, 1 t Salt, 1 t dried Oregano
- 1 t fresh chopped Cilantro, 2 T Olive Oil, juice of 1/2 lime, 1 t Salt, 1 t Sugar
Pork: $4.00 (Sunmart or less on full loin chopped up)
Most of these are items you already have on hand in your cupboards. So in my book, I count the marinades as free.
Couple of grilling tips: Make sure that your grill is good and hot before putting the meat on. Rub a bit of oil on the grates (use a basting brush or a coated paper towel) to keep it from sticking if there isn't any in the marinade. Use the reserve marinade to baste while cooking. When done cooking, allow to sit for 5-10 minutes to keep juices locked in.
Bring on Spring.
Subscribe to:
Posts (Atom)